There is a bucket-load of advice out there on how to take good animal photos. Much of the advice is excellent, but it can be very confusing. And not just because it is in a bucket.
I’m going to try and keep it simple and not confuse you.
Wish me luck...
Anyone can take photos, but for them to look good you need to know a few tricks. I use some of these tricks on nearly all of my photos. If I can do it, anyone can. Well, nearly anyone.
Take a look here (my website, which also supports the African Wildlife Foundation). If you like what you see, read on. If you don’t like what you see, then imagine a raspberry blown in your direction. (I bet that doesn’t translate well...)
Here are my top ten tips to try to help improve your wildlife photography. I explain them in more detail below.
- Know your camera! Practice using it well before going away. If no animals are available, take photos of random household objects instead...
- Do not borrow or buy a new camera just before you go away, but if and when you do, do not buy a DSLR! Bloody hell, sacrilege already! I now use a compact camera!!! What???!!! I will explain below...
- Where can you shoot wildlife? (er, with a camera ok?). Short answer; Serengeti/Masai Mara. Or the zoo. Or your back garden. Or somebody else’s back garden.
- Shoot in the raw. Ah! That made you look up! Here are a couple of acronyms that I explain below in basic detail. Shoot in jpg if you must, but always shoot in RAW.
- Get your camera ready to take that shot NOW! If your camera can memorise settings, set them up now.
- There’s more to wildlife photography than animals. Include the animal’s environment in the photo if you can. If you can’t, cheat.
- Focus. Press the shutter button! And then keep it pressed...
- Backup your photos. Make copies of all your photos IMMEDIATELY. Well, maybe later that day...
- To get images that look sharp, you must edit them. Increase sharpness of course, but bung up the contrast and wow! you have an image with impact. Then bung up the clarity. Phew!
- Use Photoshop. Ok don’t panic, but start learning photoshop now. It’ll be worth it in a few years...
Well, that was easy and painless wasn’t it? (Apart from tip number 10 that is.) But I had better expand on these points a little, and if possible inject a bit of humour to try to stop you all dozing off.
Oops, too late.
1. Know your camera!
This may seem obvious, but many people borrow or buy a new camera just before going on safari. It takes a good couple of months of daily use to gain enough confidence with your camera. Assuming that you don’t live in a wildlife park, then take a picture of something more mundane every day. Anything. Someone mentioned random household objects...
 Seriously. Practice your photography on anything. Make sure you include both bright and dark objects.
2. Equipment
Let’s get this baby out of the way. Most of the pro-photographers out there are going to violently disagree with me here, which is why I haven’t included my home address. I’m not a fan of violence. If you want to look like a real pro (in the photography sense of the word), get a huge DSLR (digital single lens reflex, otherwise known as a posh camera) with a handgrip battery and a really long lens. Oh yes, and it has to be a really long white lens.
Looks good huh?
Unfortunately, you can hand-hold these for about 5 seconds before your arm drops off.
After many years of using DSLRs (and by ‘many’ I mean a lot), I’ve now changed to using a compact camera. Why? Because I’m a seven stone weekling. Or... actually because, in the last couple of years, we have seen a revolution in sensor design. Sony have now cracked the problems with small sensors on their high end compact RX10 (marks 3&4). Other makes are available...
A sensor is that thingy inside the camera that acts like the retina in your eye. The retina is that stuff inside your eyes that, er, acts like the sensor in your camera...
Anyway, enough of this rambling, here are the reasons that I’ve changed:
- Weight and space. I used to carry a minimum of three lenses. Once you add in a 600mm then your baggage allowance is full! No underwear!
- Changing lenses is a pain. You will miss shots. The Sony goes from very wide angle (24mm) to very long telephoto (600mm).
- With DSLRs you will get dust on your sensor, I used to have to photoshop out dust all the time. Cleaning sensors is very tricky!
- Resolution used to be a problem with smaller sensors. Sony have cracked it.
- Speed. Taking 9 shots a second means a much higher chance of getting a sharp photo etc. Plus the speed of focus on the Sony is amazing.
- I carry my Sony pretty much wherever I go. I’ve adapted a small bag that doesn’t look much like a camera bag. Easy! It also isn’t so much of a target for thieves. Sadly, the down side is the lack of machismo.
- Cost. It’s an expensive camera, but MUCH cheaper than buying a high-end DSLR and some decent lenses.
- Distortion. There is almost no distortion or aberration with the Sony.
- Exposure adjustment is on an easy to use dial by your thumb.
- Aperture (depth of focus, like the pupil in your eye...) is on a dial on the lens. Just like old cameras! Easy to check as you lift the camera up to your eye.
- No tripod necessary! Good stabilisation at 600mm and not a heavy camera. Tripods are a pain.
3. Where to shoot Wildlife
Although money and personal preference are key here, if you get the chance to go to the Serengeti, do so. There is wildlife wherever you look. Even under your bed.
A couple of tips:
- Most camps like to take you out for morning and evening drives, leaving you to have free time all afternoon. Whoopee. Try to find guides that will take you out for the whole day. It is tiring, but you will see so much more.
- Many camps are luxurious. But you will pay for it. If you are out all day you will only be using the camp for eating and sleeping, so why would you need a swimming pool?
- Check under your bed.
4. Photo Format.
Somewhere hidden in the depths of the menu of your camera will be a setting that will define the quality of your photo. Almost every photo you will see is in a format called jpeg. It’s just a name, so don’t panic. If there is an option to use a format called RAW, please use it. This format basically stores lots more information.
Let me explain.
When you look at a scene with your eyes (um, I mean as opposed to a camera, not as opposed to another part of your anatomy) you only see detail right in the middle of your field of view. All the rest is guessed! It’ll normally be a good guess because your eye flicks around taking in all the detail. That centre point adapts automatically to the light available. If you look at a shadowy bit, you see the detail. If you look at a bright bit, you see the detail. Cameras have problems here. They cannot get the full detail in all parts of the scene. Worse still, your camera may initially see lots of detail, but as your camera produces the final image, most of that detail is thrown away!
That final image, with all the juicy bits disposed of, is the jpeg image. The original image with all the hidden stuff is the RAW image. Try to keep that RAW image if you possibly can! Then, when you come to editing it later, you can get your paws on all that detail. If not, black areas will be permanently black, and worse, white areas will be permanently washed out. No fluffy clouds, just white.
RAW images before editing look rubbish. That’s why most people stick to jpegs. But instead of some nameless guy in a lab in Japan deciding what processing your photo should have, take control yourself!
Many cameras will let you take both jpeg and RAW at the same time, so if in doubt, do that. When, in the fullness of time, you get better at editing photos, you will want to go back to those that you took years ago and edit then with your new found prowess. Then you will thank me...
5. Basic Camera Setup.
You need to know your camera, and this takes time and practice. You will need to switch between close-ups (all shots from a week in Botswana):
 Wide angle:
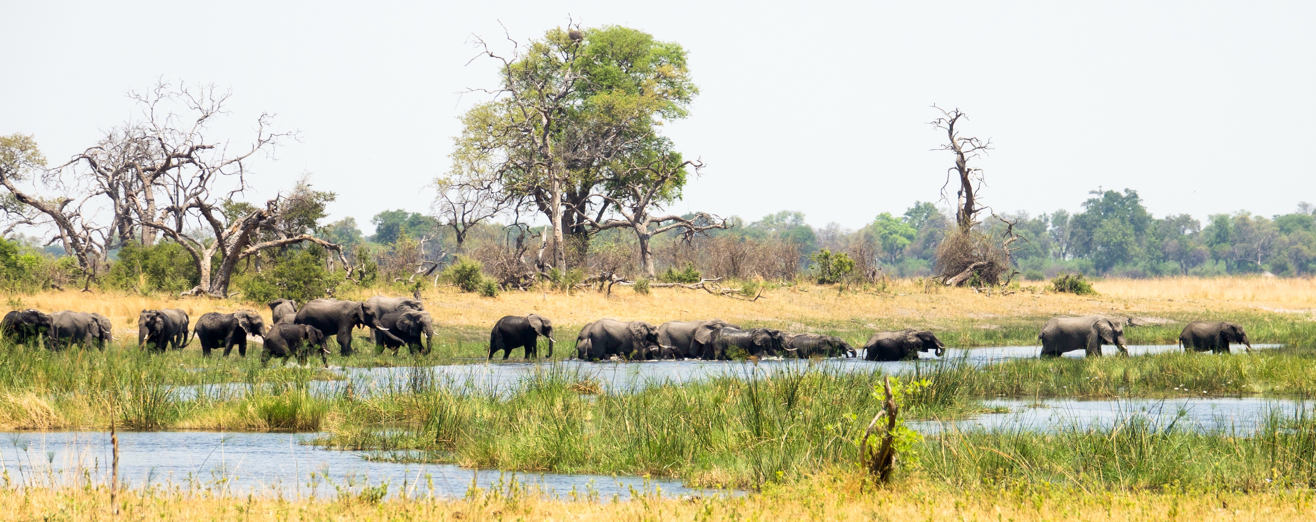 Sunsets:
 Action shots:
 Telephoto shots:
And macro shots:

To be ready for each shot you need to set your camera up beforehand. This can be sped up using the menu settings. Each camera is different here. My Sony has a hopeless menu system, which took me ages to get used to. Not the sort of thing you would want to be doing whilst on safari.
If your camera has memory settings, use them! I use three basic set ups for safari:
- Aperture priority for most photos, with aperture set to wide open for depth of focus and speed.
- Speed priority (set to default at 200th of a second, but will change it using a dial by my thumb) for moving targets as light gets poorer.
- And a memory setting for exposure bracketing (three photos taken very rapidly with different exposures). This setting is most useful for HDR photography (not much use for wildlife) but I also use it for sunsets to get the best exposure. This is too complex to get into detail here, there is plenty of detail out there on the internet, but here’s a non-safari example of what you can do:
 The other thing you will have to do with a DSLR is, of course, change the lens. Good luck with that on a bumpy game drive. Stop! There’s a pangolin! Anchors dropped, skids to a halt, takes off lens, replaces with other lens whilst dust settles. Everywhere. Adjusts camera settings. Takes photo...
... of bare grass.
6. Framing.
When you frame an animal in the viewfinder of your camera, just bear in mind what the final photo will look like. Make the shot wide enough so that you can crop down to the best frame. If an animal is looking or moving left, include more of the view to the left:

7. Focusing.
Modern cameras are pretty damned good at focusing all by themselves. But they ain’t perfect. To get around this, keep you camera set up to take multiple shots. Keep your finger pressed down. My camera takes nearly 10 shots a second. I’ll probably be happy with one photo in every twenty of them. Make sure you have a big memory card and just keep snapping! I average over 7,000 shots in a week’s safari. I’ll keep maybe 300. I dont throw away the rest, in case I want to go back to them at some future date when I’ve learnt a new editing technique.
Here’s an example of a shot I took of a gorilla running towards me. Panic shot! Out of focus! Editing techniques saved this memorable moment a couple of years later:

8. Backing Up your Photos.
When away from home, you need to find some way of saving your photos somewhere other than the camera. Theft, damage or loss is distressing enough, but losing all your hard earned photos, well, that would be bad. Save to an iPad, phone, laptop or external drive. At the end of each day’s shooting, I remove the memory card, back it up, then put the card in my wallet, kept separate from my camera. Some cameras have two memory card slots, so use one to back up the other. It matters not as long as they are kept separate from the camera. Figure out how to do it before going on holiday!
When you get home, save your photos to a computer and back them up. Then back them up elsewhere. Only then is it safe to format the camera’s memory cards. Remember the Rule of Three; if you do not have three copies of your photos, then (eventually) you don’t have any. Hard discs will fail, houses burn down, memory cards get eaten by the dog, iPads get dropped in the bath.
9. Editing.
For many photographers, this is where it gets scary, but it can be easy and even exciting to watch your photos transform before your eyes.
Being a keen photographer makes your holiday very much longer! The day you must leave is only the start of potentially months of editing your thousands of photos.
If you are going to be taking lots of photos, you need some way of categorising them, so that they can be found a few years later. I use Lightroom. Here are some tips:
- Lightroom is not intuitive. You cannot simply load it onto your computer then start using it, if you do, it will scare you off. Before you attempt it, watch videos online on how to set up Lightroom, then how to import your photos, how to organise them, then how to edit them.
- Most editing can now be done just using Lightroom. Photoshop is brilliant, but only once you have mastered Lightroom.
- When importing images into Lightroom, set it to automatically add the date to the camera generated name.
- Set up folders by year, then subfolders by name of holidays etc.
- When editing, try the automatic edit first, then bung up contrast, sharpness, clarity and vibrancy to see how they look.
- Next step, use plugins such as topaz software for additional effects like this:

10. Photoshop.
Ok, photoshop is difficult to learn, but I promise you that it is worth it. One big problem on safari is getting your chosen animal into your chosen environment. So often they can just be a few meters from the optimum position. One thing that you shouldn’t try is to get out of the vehicle and go and prod them to move a little. Photoshop is significantly safer.
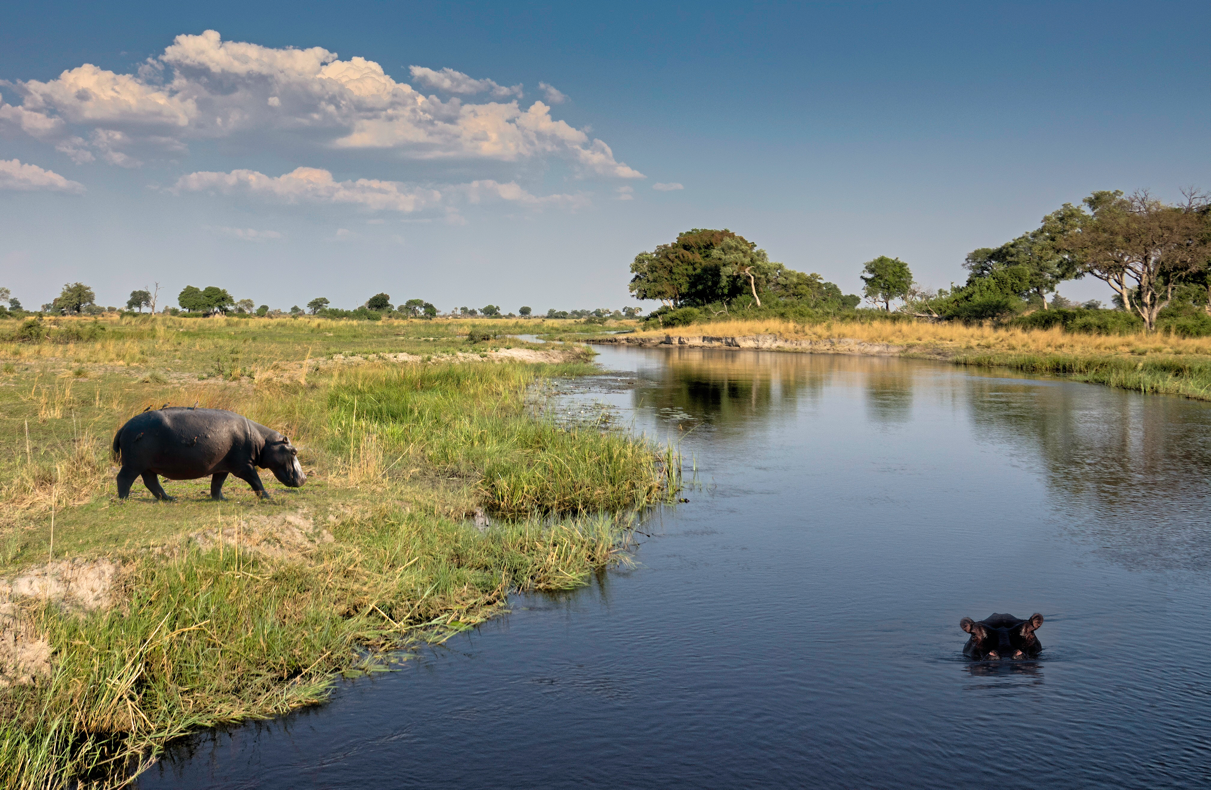 Both those hippos were snapped elsewhere.
Alternatively, you may want a photo of your chosen lovers together:
 Cutting and pasting, using the selection tools, layers and masking takes ages to learn, but it can be much less painful than trying to gently persuade them to pose together.
So, lots to learn, but all of it makes photography more exciting, more rewarding, and your holidays longer.
Happy snapping!
Happy snapping!
No comments:
Post a Comment